Linux boot process
When a system is first booted, or is reset, the processor executes code at a well-known location. In a personal computer (PC), this location is in the basic input/output system (BIOS), which is stored in flash memory on the motherboard.
BIOS :
BIOS isn't the only program on your system ROM. When the computer is turned on or reset, it initiates a special program, also stored on the system ROM chip, called the Power-On self test. The POST program checks out the system every time the computer boots. To perform this check, the POST sends out a command that says to all the devices, "Check yourselves out!". All the standard devices in the computer then run their own internal diagnostic-the POST doesn't specify what they must check. The quality of the diagnostic is up to people who made that particular devices.
When a boot device is found, the first-stage boot loader is loaded into RAM and executed. This boot loader is less than 512 bytes in length (a single sector), and its job is to load the second-stage boot loader.
When the second-stage boot loader is in RAM and executing, a splash screen is commonly displayed, and Linux and an optional initial RAM disk (temporary root file system) are loaded into memory. When the images are loaded, the second-stage boot loader passes control to the kernel image and the kernel is decompressed and initialized. At this stage, the second-stage boot loader checks the system hardware, enumerates the attached hardware devices, mounts the root device, and then loads the necessary kernel modules. When complete, the first user-space program (
init) starts, and high-level system initialization is performed.
That's Linux boot in a nutshell Now let's dig in a little further and explore some of the details of the Linux boot process.
The system startup stage depends on the hardware that Linux is being booted on. On an embedded platform, a bootstrap environment is used when the system is powered on, or reset. Examples include U-Boot, RedBoot, and MicroMonitor from Lucent. Embedded platforms are commonly shipped with a boot monitor. These programs reside in special region of flash memory on the target hardware and provide the means to download a Linux kernel image into flash memory and subsequently execute it. In addition to having the ability to store and boot a Linux image, these boot monitors perform some level of system test and hardware initialization. In an embedded target, these boot monitors commonly cover both the first- and second-stage boot loaders.
Extracting the MBR
To see the contents of your MBR, use this command:# dd if=/dev/hda of=mbr.bin bs=512 count=1
# od -xa mbr.bin The
dd command, which needs to be run from root, reads the first 512 bytes from /dev/hda (the first Integrated Drive Electronics, or IDE drive) and writes them to the mbr.bin file. The od command prints the binary file in hex and ASCII formats.In a PC, booting Linux begins in the BIOS at address 0xFFFF0. The first step of the BIOS is the power-on self test (POST). The job of the POST is to perform a check of the hardware. The second step of the BIOS is local device enumeration and initialization.
Given the different uses of BIOS functions, the BIOS is made up of two parts: the POST code and runtime services. After the POST is complete, it is flushed from memory, but the BIOS runtime services remain and are available to the target operating system.
To boot an operating system, the BIOS runtime searches for devices that are both active and bootable in the order of preference defined by the complementary metal oxide semiconductor (CMOS) settings. A boot device can be a floppy disk, a CD-ROM, a partition on a hard disk, a device on the network, or even a USB flash memory stick.
Commonly, Linux is booted from a hard disk, where the Master Boot Record (MBR) contains the primary boot loader. The MBR is a 512-byte sector, located in the first sector on the disk (sector 1 of cylinder 0, head 0). After the MBR is loaded into RAM, the BIOS yields control to it.
The job of the primary boot loader is to find and load the secondary boot loader (stage 2). It does this by looking through the partition table for an active partition. When it finds an active partition, it scans the remaining partitions in the table to ensure that they're all inactive. When this is verified, the active partition's boot record is read from the device into RAM and executed.
Note : 0xAA55 is the magic number which leads to identify the boot loader.
The secondary, or second-stage, boot loader could be more aptly called the kernel loader. The task at this stage is to load the Linux kernel and optional initial RAM disk
/boot/vmlinuz is the compressed Linux kernel.
GRUB stage boot loaders
The/boot/grub directory contains the stage1, stage1.5, and stage2 boot loaders, as well as a number of alternate loaders (for example, CR-ROMs use the iso9660_stage_1_5).The first- and second-stage boot loaders combined are called Linux Loader (LILO) or GRand Unified Bootloader (GRUB) in the x86 PC environment. Because LILO has some disadvantages that were corrected in GRUB, let's look into GRUB. (See many additional resources on GRUB, LILO, and related topics in the Resources section later in this article.)
The great thing about GRUB is that it includes knowledge of Linux file systems. Instead of using raw sectors on the disk, as LILO does, GRUB can load a Linux kernel from an ext2 or ext3 file system. It does this by making the two-stage boot loader into a three-stage boot loader. Stage 1 (MBR) boots a stage 1.5 boot loader that understands the particular file system containing the Linux kernel image. Examples include
reiserfs_stage1_5 (to load from a Reiser journaling file system) or e2fs_stage1_5 (to load from an ext2 or ext3 file system). When the stage 1.5 boot loader is loaded and running, the stage 2 boot loader can be loaded.With stage 2 loaded, GRUB can, upon request, display a list of available kernels (defined in
/etc/grub.conf, with soft links from /etc/grub/menu.lst and /etc/grub.conf). You can select a kernel and even amend it with additional kernel parameters. Optionally, you can use a command-line shell for greater manual control over the boot process. With the second-stage boot loader in memory, the file system is consulted, and the default kernel image and
initrd image are loaded into memory. With the images ready, the stage 2 boot loader invokes the kernel image.After the kernel is booted and initialized, the kernel starts the first user-space application. This is the first program invoked that is compiled with the standard C library. Prior to this point in the process, no standard C applications have been executed.
In a desktop Linux system, the first application started is commonly
/sbin/init. But it need not be. Rarely do embedded systems require the extensive initialization provided by init (as configured through /etc/inittab). In many cases, you can invoke a simple shell script that starts the necessary embedded applications. Runlevel :
/etc/inittab file contains the runlevel.
It run the script /etc/rcS.d$s*
Getty :
It provides the Graphical User Interface and prompt user for login.
Thats all Iknow about the booting procedure. Kindly revert with the valuable feedback about this post.
Chicken and Egg Problem in Linux Module
The
Linux kernel needs to mount the root file system. To do so, it
typically need access to modules.
For
example, the following file system related capabilities are modular
(not build into the kernel):
ext3
file system & journaling
LVM
RAID
SCSI
controller support
If
the kernel requires any of these capabilities to mount the root file
system, it will need access to the related modules.
"where
does the kernel get modules"
Typically,
the kernel gets the modules from the /lib/module/$(uname -r)/
directory.
Hence,
this presents a classic chicken/egg problem; as the kernel cannot
mount the root file system without access to the modules and modules
are on the root file system.
The
solution for this is the GRUB bootloader and the Kernel work together
through the use of the initial RAM disk, which is part of the typical
GRUB specification for a Linux Kernel:
title
Red Hat Enterprise Linux Server (2.6.18-53.el5)
root
(hd0,0)
kernel
/vmlinuz-2.6.18-53.el5 ro root=LABEL=/
initrd
/initrd-2.6.18-53.el5.img
The
last line indicates that the initial RAM disk file is called
initrd-2.6.18-53.el5.img and that it is resident in /boot. And from
there, the kernel will load the module.
How to find out the type of file in Unix
The first and most obvious way to confirm the type of a particular file is to use the long-format output of ls command, invoked by the -l option:$ ls -l * -rw-r--r-- 1 greys greys 1024 Mar 29 06:31 textThe very first field of such output is the file type and access permissions field, I'll cover them in a separate post in the future. For now, just concentrate on the first character in this field. In this particular case, it's "-", which means it's a regular file. For other file types, this character will be different.
Regular file
This is the most common type of a file in Unix. Being a plain collection of bytes with arbitrary data. There's nothing mysterious about this type. Most of the files you will ever work with are regular.In long-format output of ls, this type of file is specified by the "-" symbol.
Directory
This is a special type of a file in Unix, which only contains a list of other files (the contents of a directory). You don't work with directories directly, instead you manage them with standard commands provided with your OS. The whole directory structure of your Unix system is made of such special files with directory content in each of them.In long-format output of ls, this type of file is specified by the "d" symbol:
$ ls -ld *
 -rw-r--r-- 1 greys greys       1024 Mar 29 06:31 text
 drwxr-xr-x 2 greys greys       4096 Aug 21 11:00 mydir
Special Device File
This type of files in Unix allows access to various devices known to your system. Literally, almost every device has a special file associated with it. This simplifies the way Unix interacts with different devices – to the OS and most commands each device is still a file, so it can be read from and written to using various commands. Most special device files are owned by root, and regular users cannot create them,Depending on the way of accessing each device, its special device file can be either a character (shown as "c" in ls output) or a block (shown as "b") device. One device can have more than one device file associated, and it's perfectly normal to have both character and block device files for the same device.
Most special device files are character ones, and devices referred by them are called raw devices. The simple reason behind such a name is that by accessing the device via its special device character file, you're accessing the raw data on the device in a form the device is ready to operate with. For terminal devices, it's one character at a time. For disk devices though, raw access means reading or writing in whole chunks of data – blocks, which are native to your disk. The most important thing to remember about raw devices is that all the read/write operations to them are direct, immediate and not cached.
Block device file will provide similar access to the same device, only this time the interaction is going to be buffered by the kernel of your Unix OS. Grouping data into logical blocks and caching such blocks in memory allows the kernel to process most I/O requests much more efficiently. No longer does it have to physically access the disk every time a request happens. The data block is read once, and then all the operations to it happen in the cached version of it, with data being synced to the actual device in regular intervals by a special process running in your OS.
Here's how the different types of special device files look in your ls output:
$ ls -al /dev/loop0 /dev/ttys0
brw-rw---- 1 root disk 7,  0 Sep  7 05:03 /dev/loop0
crw-rw-rw- 1 root tty  3, 48 Sep  7 05:04 /dev/ttys0
Named Pipe
Pipes represent one of simpler forms of Unix interprocess communication. Their purpose is to connect I/O of two Unix processes accessing the pipe. One of the processes uses this pipe for output of data, while another process uses the very same named pipe file for input.In long-format output of ls, named pipes are marked by the "p" symbol:
$ ls -al /dev/xconsole
prw-r----- 1 root adm 0 Sep 25 08:58 /dev/xconsole
Symbolic Link
This is yet another file type in Unix, used for referencing some other file of the filesystem. Symbolic link contains a text form of the path to the file it references. To an end user, symlink (sort for symbolic link) will appear to have its own name, but when you try reading or writing data to this file, it will instead reference these operations to the file it points to.In long-format output of ls, symlinks are marked by the "l" symbol (that's a lower case L). It also show the path to the referenced file:
$ ls -al hosts
lrwxrwxrwx 1 greys www-data 10 Sep 25 09:06 hosts -> /etc/hosts
In this example, a symlink called hosts points to the /etc/hosts file.
Socket
A Unix socket (sometimes also called IPC socket – inter-process communication socket) is a special file which allows for advanced inter-process communication. In essence, it is a stream of data, very similar to network stream (and network sockets), but all the transactions are local to the filesystem.In long-format output of ls, Unix sockets are marked by "s" symbol:
$ ls -al /dev/log
srw-rw-rw- 1 root root 0 Sep  7 05:04 /dev/log
That's it. Hope this gave you a better idea of what file types you can find working on your Unix system.
Journaling file system
A journaling file system is a file system that keeps track of the changes it intends to make in a journal (usually a circular log in a dedicated area of the file system) before committing them to the main file system. In the event of a system crash or power failure, such file systems are quicker to bring back online and less likely to become corrupted.
Rationale
Updating file systems to reflect changes to files and directories usually requires many separate write operations. This makes it possible for an interruption (like a power failure or system crash) between writes to leave data structures in an invalid intermediate state- Removing its directory entry.
- Marking space for the file and its inode as free in the free space map.
In a non-journaled file system, detecting and recovering from such inconsistencies requires a complete walk of its data structures. This must typically be done before the file system is next mounted for read-write access. If the file system is large and if there is relatively little I/O bandwidth, this can take a long time and considerably lengthen system downtimes between crashes.
A journaled file system allocates a special area—the journal—in which it records the changes it intends to make, ahead of time. After a crash, recovery simply involves reading the journal from the file system and replaying changes from this journal until the file system is consistent again. The changes are thus said to be atomic (or indivisible) in that they either:
- succeed (have succeeded originally or be replayed completely during recovery), or
- are not replayed at all (are skipped because they had not yet been completely written to the journal).
Techniques
Some file systems allow the journal to grow, shrink and be re-allocated just as a regular file, while others put the journal in a contiguous area or a hidden file that is guaranteed not to move or change size while the file system is mounted. Some file systems may also allow external journals on a separate device, such as a solid-state disk or battery-backed non-volatile RAM. Changes to the journal may themselves be journaled for additional redundancy, or the journal may be distributed across multiple physical volumes to protect against device failure.Physical journals
A physical journal logs an advance copy of every block that will later be written to the main file system, followed by a checksum of those blocks. If there is a crash when the main file system is being written to, the write can simply be replayed to completion when the file system is next mounted. If there is a crash when the write is being logged to the journal, the partial write will have a missing or mismatched checksum and can be ignored at next mount.Physical journals impose a significant performance penalty where every block must be committed twice to storage, but may be acceptable when absolute fault protection is required
Logical journals
A logical journal stores only changes to file metadata in the journal, and trades fault tolerance for substantially better write performance.[3] A file system with a logical journal still recovers quickly after a crash, but may allow unjournaled file data and journaled metadata to fall out of sync with each other, causing data corruption.For example, appending to a file may involve three separate writes to:
- The file's inode, to increase its size.
- The free space map, to mark out an allocation of space for append.
- The newly-allocated space, to actually write the appended data.
The write cache in most operating systems sorts its writes (using the elevator algorithm or some similar scheme) to maximize throughput. To avoid an out-of-order write hazard with a metadata-only journal, writes for file data must be sorted so that they are committed to storage before their associated metadata. This can be tricky to implement because it requires coordination within the operating system kernel between the file system driver and write cache. An out-of-order write hazard can also exist if the underlying storage:
- cannot write blocks atomically, or
- changes the order of its writes, or
- does not honor requests to flush its write cache.
Soft updates
Some UFS implementations avoid journaling and instead implement soft updates: they order their writes in such a way that the on-disk file system is never inconsistent, or that the only inconsistency that can be created in the event of a crash is a storage leak. To recover from these leaks, the free space map is reconciled against a full walk of the file system at next mount. This garbage collection is usually done in the backgroundDynamically-allocated journals
In log-structured file systems, the write-twice penalty does not apply because the journal itself is the file system. Most Unix file systems are not log-structured, but some implement similar techniques in order to avoid the double-write penalty. In particular, Reiser4 can group many separate writes into a single contiguously-written chunk, then extend the head of the journal to enclose the newly-written chunk. The tail of the journal retracts from the chunk after it has been committed to storage.Hardware Support
Journaling file systems may require the underlying storage device to follow certain rules regarding writes of the journal entries. The device must be able to guarantee that journal entries are written to the media in the order requested by the file system software, or else inconsistencies may result. This requirement may force a trade-off between high disk performance and the ability to guarantee correctness after a sudden power loss.How to send message to users logged on to a UNIX terminal?
One of the cool features of UNIX is that you don't need to have any software installed to send message to users logged on to that machine. There is a handy command called "write" which enables you to do this. Here is the syntax of this command:1.$write username tty01.$who02.root :0 May 7 03:5103.root pts/1 May 7 03:51 (:0.0)04.root pts/2 May 7 03:51 (:0.0)05.user5 pts/10 May 7 04:17 (dhcp-dwf1-4-10-176-162-74)06.user8 pts/13 May 7 04:12 (dhcp-dwf1-4-10-176-162-180)07.user9 pts/15 May 7 04:12 (10.176.146.212)08.user7 pts/14 May 7 04:23 (dhcp-dwf1-4-10-176-162-118)09.user12 pts/18 May 7 04:14 (dhcp-dwf1-4-10-176-162-119)10.user11 pts/23 May 7 04:14 (dhcp-dwf1-4-10-176-162-31)11.user1 pts/22 May 7 04:27 (dhcp-dwf1-4-10-176-162-125)12.user15 pts/24 May 7 04:14 (dhcp-dwf1-4-10-176-162-65)13.user6 pts/12 May 7 04:14 (dhcp-dwf1-4-10-176-162-120)14.user2 pts/28 May 7 04:14 (dhcp-dwf1-4-10-176-162-60)15.user7 pts/30 May 7 04:14 (dhcp-dwf1-4-10-176-162-118)16.user4 pts/31 May 7 04:14 (dhcp-dwf1-4-10-176-162-72)17.user10 pts/32 May 7 04:14 (dhcp-dwf1-4-10-176-162-68)18.user14 pts/33 May 7 04:14 (dhcp-dwf1-4-10-176-162-27)1.$write user8 pts/13
Now write any message you want. To end the message, press Ctrl+D. Your message would be sent.

To quit "top", you have to press Q key of your keyboard.
To get CPU utilization information, type in following command:
 To monitor individual processor performance, issue following command:
 The "sar" command
To display CPU utilization using "sar", use following command:
This command will display CPU utilization 2 seconds apart, 5 times as shown below.


GUI Tools

The kernel read the super block to figure out the details about the hard drive and the inode table to find the meta data information of any file. So the kernel reads the inode into the memory whenever any process want to access the data and write it back onto the hard disk when the process is done using the file.
The kernel could read and write the file directly from the hard disk and put it in memory and vice versa but the response time and throughput will be very low in this case because of disks sow data transfer speed.
To minimize the frequency of disk usage/access the kernel keeps a buffer to store the recently accessed files and/or frequently accessed files. This buffer is called the buffer cache.
When the process want to read a file the kernel attempts to read this file in the buffer cache, if the data is found in the buffer cache the data/file is sent to the process. If the file is not found in the buffer cache then the file is read from the disk and then kept in the buffer cache so that it can be made available to the process.
To minimize the disk access frequency the kernel may also implement the pre-caching or write delay functionalities.
The data in the buffer cache corresponds to the logical blocks of the disk block of file system. The buffer cache is “in memory” representation of the disk blocks. This mapping is temporary as the kernel may wish t load some other files’ data into the cache at some later stage.
There will never be a case when the buffer has two entries for the same file on disk as this could lead to inconsistencies. There is only and only one copy of a file in the buffer.
The buffer header contains the metadata information like device number and the block number range for which this buffer holds the data. It stores the logical device number and not the physical device number. The buffer header also contains pointer to a data array for the buffer (i.e. pointer to the data region) .
The buffer header also contains the status of the buffer. The status of the buffer could be

When kernel wants to allocate any buffer it removes a node from the free list, usually from the beginning of list but is could take it from middle of the list too. When kernel frees a node from the buffer list it adds this free node at the end of the free list.

When kernel want to access the disk it searches the buffer pool for a particular device number-block number combination (which is maintained in the buffer header). The entire buffer pool is organized as queues hashed as a function of device number-block number combination. The figure down below shows the buffers on their hash queues.

The important thing to note here is that no two nodes in the buffer pool can contain the data of same disk block i.e. same file.

The five typical scenarios that kernel may follow in getblk to allocate a buffer in the disk block are


Before continuing to other scenarios lets see what happens after the buffer is allocated. The kernel may read the data, manipulate it and/or change it in the buffer. While doing so the kernel marks the buffer as busy so that no other process can access this block. When the kernel is done using this block it releases the buffer using brelse algorithm.

The second scenario - Cannot find block on the hash queue => allocate a buffer from free list.


The third scenario - Cannot find block on the hash queue => allocate a buffer from free list but buffer on the free list marked “delayed write” => flush “delayed write” buffer and allocate another buffer.


The fourth scenario - Cannot find block on the hash queue and free list of buffer also empty.


Virtually all commands understand the -h (or -help) option which will produce a short usage description of the command and its options, then exit back to the command prompt. Try man -h or man -help to see this in action.
Every command and nearly every application in Linux will have a man (manual) file, so finding them is as simple as typing man command to bring up a longer manual entry for the specified command. For example, man mv will bring up the mv (Move) manual.
Some helpful tips for using the man command include:
If you need to execute multiple commands in sequence, but don't need to pass output between them, there are two options based on whether or not you want the subsequent commands to run only if the previous commands succeed or not. If you want the commands to run one after the other regardless of whether or not preceding commands succeed, place a ; between the commands. For example, if you want to get information about your hardware, you could run lspci ; lsusb, which would output information on your PCI buses and USB devices in sequence.
However, if you need to conditionally run the commands based on whether the previous command has succeeded, insert && between commands. An example of this is building a program from source, which is traditionally done with ./configure, make, and make install. The commands make and make install require that the previous commands have completed successfully, so you would use ./configure && make && make install.
To use the pipe, insert the | between each command. For example, using the | in the command ls | less allows you to view the contents of the ls more easily.
This info is valid for AIX 4.3.3, AIX 5.1, AIX 5.2 and AIX 5.3.
By default, an AIX system will not do syslog'ging. For a strange reason, the default install on an AIX install will not place entry's in /etc/syslog.conf, leaving a totl userless syslogd.
Even more, comparing the syslogd on AIX to another Unix, (ex: Linux), you will notice that <facility>.* doesn't work. So make sure that your priority level is never *.
Comming from a Linux world, you most probably want the following config:
Open the /etc/syslogd.conf file and comment those logs which you want to capture like *.debuglog. Now perform the following steps to configure it.
Everyone knows that CPU utiization in windows can be found out from Windows Task Manager. But what about Linux? Well Linux has also got set of utilities to monitor CPU utilization. With these commands you can find out total CPU utilization, individual CPU utilization (for SMP machines), your system's average CPU utilization since the last reboot, determine which process is eating up your CPU(s) etc.
Good old "top" command
The top command provides dynamic view of CPU utilization. It displays system information as well as list of tasks currently managed by kernel. Is also displays uptime, average load, physcal and swap memory utilization. Syntax of top command is as follows:
1.$ top
To quit "top", you have to press Q key of your keyboard.
Using "mpstat" command
To use this command, you have to install a package called sysstat. For Ubuntu or Debian systems, you can install this package using apt-get.
1.$ apt-get install sysstat1.$ mpstat To monitor individual processor performance, issue following command:
1.$ mpstat -P ALL The "sar" command
To display CPU utilization using "sar", use following command:
1.$ sar -u 2 5
The "iostat" command
The iostat command reports Central Processing Unit (CPU) statistics and input/output statistics for devices and partitions. It can be use to find out your system's average CPU utilization since the last reboot.
1.$ iostat
The "htop" command
The htop command is a free (GPL) ncurses-based process viewer for Linux. It is similar to top, but allows you to scroll vertically and horizontally, so you can see all the processes running on the system, along with their full command lines. It provides dynamic listing of running process of the system in more verbose manner.
The htop command is a free (GPL) ncurses-based process viewer for Linux. It is similar to top, but allows you to scroll vertically and horizontally, so you can see all the processes running on the system, along with their full command lines. It provides dynamic listing of running process of the system in more verbose manner.

GUI Tools
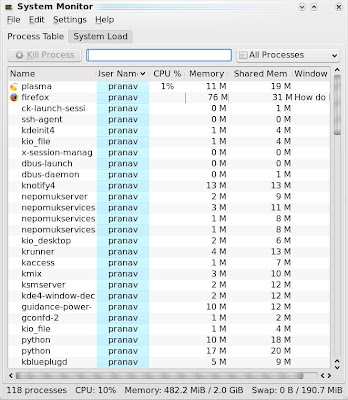
KDE desktop environment has a system monitor utility which shows CPU utilization as well as many more information. You can also kill a process using this utility as shown below:

It also gives CPU load information, physical and swap memory usage data in graphical format as shown below:

For learning more about above commands and their options, you can go through their man pages.

This inode is short form for index node. Every file has one inode. The inodes of all the files on the system are stored in inode table. When we create a new file a new entry in the inode table is created.
The kernel contain two data structures file table and user file descriptor table. The file table is global table at the kernel level but the user file descriptor table s for every process. When a process creates a file or opens a file the entry for that is made in both the tables.
The information about the current state of the file is maintained in the file table. For example if the file is being written the information about the current cursor position is kept in the file table. This file table also checks whether the accessing process has access to that file or not.
The user file descriptor table keeps a track of all the files opened by the processes and what are the relationships between these files.

The regular files and folders are kept on block devices like disks and tape drives. The drive has logical block numbers and physical block numbers and the mapping from logical to physical block numbers is done by disk driver.

The process that executes fork is called the parent process and the process that was created is called the child processes. A process can have many child but only one parent.
Kernel identifies every process by a unique identifier called the process ID or PID.
Data: The uninitialized data members (buffer)
Stack: logical stack frames created during function calls. This is created automatically and grows dynamically.
Since the processes in unix executes in two modes, kernel and user. There are separate stacks for both the modes.
All the processes in the system are identified by PID which are stored in the process table. Every process has an entry in the kernel process table. Every process is allocated the u-area(user area in the main memory. The region is the contiguous area of process addresses.
The processes table entry and u area controls the status information about the process. U area is extension of process table entry.

So if there are free entries in the kernel data structures we are wasting the potential resources of kernel and if, on the other hand the kernel data structure table is free we need to find a way to notify the processes that something has gone wrong.
The simplicity of kernel code, which is because of this limited size of data structures has far too many advantages than disadvantages.
They only differ from user processes in rights and privileges they have. So to summarize, kernel cannot distinguish between kernel process and user process it is just the permission of processes and files that some behave as administrative processes and some behave as the user processes.
Introduction to kernel
Introduction to system concepts – overview of file subsystem
The internal representation of the file is in the form of iNode. This inode contains the information about the file such as its layout on the disk, its owner, its access permissions and last accessed time.This inode is short form for index node. Every file has one inode. The inodes of all the files on the system are stored in inode table. When we create a new file a new entry in the inode table is created.
The kernel contain two data structures file table and user file descriptor table. The file table is global table at the kernel level but the user file descriptor table s for every process. When a process creates a file or opens a file the entry for that is made in both the tables.
The information about the current state of the file is maintained in the file table. For example if the file is being written the information about the current cursor position is kept in the file table. This file table also checks whether the accessing process has access to that file or not.
The user file descriptor table keeps a track of all the files opened by the processes and what are the relationships between these files.
The regular files and folders are kept on block devices like disks and tape drives. The drive has logical block numbers and physical block numbers and the mapping from logical to physical block numbers is done by disk driver.
File system layout
- The boot block occupies the beginning of the file system. This contains the bootstrap code that is required for the machine to boot.
- Super block describes the state of the file system i.e. its size, maximum number of files that can be stored and the free space information.
- The inode list contains the inode table and the kernel references the inode list area to get the information about the files stored on the machine.
- The data block is the end of the inode list and starting of the blocks that can be used to store the user files. The starting area of the data block will contain some administrative files and information and the later block contains the actual files.
Introduction to system concepts – Process subsystem
A process on unix can be created by executing the fork system call. Only the process 0 is created without using this system call and all other processes are created using the fork system call. (Process 0 was created manually by booting the system.)The process that executes fork is called the parent process and the process that was created is called the child processes. A process can have many child but only one parent.
Kernel identifies every process by a unique identifier called the process ID or PID.
Process regions:
Text : The information about the instructions of the processData: The uninitialized data members (buffer)
Stack: logical stack frames created during function calls. This is created automatically and grows dynamically.
Since the processes in unix executes in two modes, kernel and user. There are separate stacks for both the modes.
All the processes in the system are identified by PID which are stored in the process table. Every process has an entry in the kernel process table. Every process is allocated the u-area(user area in the main memory. The region is the contiguous area of process addresses.
The processes table entry and u area controls the status information about the process. U area is extension of process table entry.
Context of a process
Context of a process is state. When a process is executing the process has a context of execution. When the process shifts from the running to waiting state the context switching takes place.Process states
Process state in unix could be one of the following- Ready
- Running in user mode
- Running in kernel mode
- Sleeping/waiting
- Terminated
State transition
Kernel data structures
The kernel data structures occupy fix size tables rather than dynamically allocated space. This approach has one advantage, the kernel code is simpler but there is one disadvantage of this approach too. It limits the number of entries in these data structures.So if there are free entries in the kernel data structures we are wasting the potential resources of kernel and if, on the other hand the kernel data structure table is free we need to find a way to notify the processes that something has gone wrong.
The simplicity of kernel code, which is because of this limited size of data structures has far too many advantages than disadvantages.
System Administration
Processes that do various functions performed for the general welfare of the user community. Conceptually there is no difference between administrative process and user process. They use same set of system calls user processes do.They only differ from user processes in rights and privileges they have. So to summarize, kernel cannot distinguish between kernel process and user process it is just the permission of processes and files that some behave as administrative processes and some behave as the user processes.
The Buffer Cache
Now we know that the files are stored on the hard drive and the processes can access these files and create new files on the disk. When a process requests for a file the kernel brings the file into the main memory where user process can change, read or access the file.
The kernel read the super block to figure out the details about the hard drive and the inode table to find the meta data information of any file. So the kernel reads the inode into the memory whenever any process want to access the data and write it back onto the hard disk when the process is done using the file.
The kernel could read and write the file directly from the hard disk and put it in memory and vice versa but the response time and throughput will be very low in this case because of disks sow data transfer speed.
To minimize the frequency of disk usage/access the kernel keeps a buffer to store the recently accessed files and/or frequently accessed files. This buffer is called the buffer cache.
When the process want to read a file the kernel attempts to read this file in the buffer cache, if the data is found in the buffer cache the data/file is sent to the process. If the file is not found in the buffer cache then the file is read from the disk and then kept in the buffer cache so that it can be made available to the process.
To minimize the disk access frequency the kernel may also implement the pre-caching or write delay functionalities.
Buffer Headers
When the system initializes the kernel allocates the space for the buffer cache. The buffer cache contains two regions/arts. One for the data/files that will be read from the disk, second the buffer header.The data in the buffer cache corresponds to the logical blocks of the disk block of file system. The buffer cache is “in memory” representation of the disk blocks. This mapping is temporary as the kernel may wish t load some other files’ data into the cache at some later stage.
There will never be a case when the buffer has two entries for the same file on disk as this could lead to inconsistencies. There is only and only one copy of a file in the buffer.
The buffer header contains the metadata information like device number and the block number range for which this buffer holds the data. It stores the logical device number and not the physical device number. The buffer header also contains pointer to a data array for the buffer (i.e. pointer to the data region) .
The buffer header also contains the status of the buffer. The status of the buffer could be
- Locked/unlocked
- Buffer contains a valid data or not.
- Whether the kernel should write the contents to disk immediately or before reassigning the buffer(write delay)
- Kernel is currently reading the data or writing the data.
- Is there any process waiting for the buffer to get free.
Structure of the buffer pool
The kernel caches the least recently used data into the buffer pool. Once a balck from buffer pool is allocated for a file of the system this bliock cannot be used for any other file’s data. The kernel also maintains a free list of buffers. The free list is a doubly circular list of buffers.When kernel wants to allocate any buffer it removes a node from the free list, usually from the beginning of list but is could take it from middle of the list too. When kernel frees a node from the buffer list it adds this free node at the end of the free list.
When kernel want to access the disk it searches the buffer pool for a particular device number-block number combination (which is maintained in the buffer header). The entire buffer pool is organized as queues hashed as a function of device number-block number combination. The figure down below shows the buffers on their hash queues.
The important thing to note here is that no two nodes in the buffer pool can contain the data of same disk block i.e. same file.
Scenarios of retrieval of buffer
High level kernel algorithms in file subsystem invoke the algorithms of buffer pool to manage the buffer cache. The algorithm for reading and writing disk blocks uses the algorithm getblk to allocate buffer from the pool.The five typical scenarios that kernel may follow in getblk to allocate a buffer in the disk block are
- Block in the hash queue, and its buffer is free.
- Cannot find block on the hash queue => allocate a buffer from free list.
- Cannot find block on the hash queue => allocate a buffer from free list but buffer on the free list marked “delayed write” => flush “delayed write” buffer and allocate another buffer.
- Cannot find block on the hash queue and free list of buffer also empty.
- Block in the hash queue, but buffer is busy.
Before continuing to other scenarios lets see what happens after the buffer is allocated. The kernel may read the data, manipulate it and/or change it in the buffer. While doing so the kernel marks the buffer as busy so that no other process can access this block. When the kernel is done using this block it releases the buffer using brelse algorithm.
The second scenario - Cannot find block on the hash queue => allocate a buffer from free list.
The third scenario - Cannot find block on the hash queue => allocate a buffer from free list but buffer on the free list marked “delayed write” => flush “delayed write” buffer and allocate another buffer.
The fourth scenario - Cannot find block on the hash queue and free list of buffer also empty.
- The fifth scenario - Block in the hash queue, but buffer is busy.
Algorithms for Reading and writing disk blocks
Advantages of the buffer cache
- Uniform disk access => system design simpler
- Copying data from user buffers to system buffers => eliminates the need for special alignment of user buffers.
- Use of the buffer cache can reduce the amount of disk traffic.
- Single image of of disk blocks contained in the cache => helps insure file system integrity
Disadvantages of the buffer cache
- Delayed write => vulnerable to crashes that leave disk data in incorrect state
- An extra data copy when reading and writing to and from user processes => slow down when transmitting large data
Welcome to Command Line Interface
Moving around the FileSystem
Commands for moving around the file system include the following:- pwd: The pwd command will allow you to know the directory in which you're located (pwd stands for "print working directory").
- cd: The cd command will allow you to change directories. When you open a terminal you will be in your home directory. To move around the file system you will use cd. For example, cd ~/Desktop will move you to your desktop directory.
- To navigate into the root directory, use cd /
- To navigate to your home directory, use cd~
- To navigate up one directory level, use cd ..
- To navigate to the previous directory (or back), use cd -
- To navigate through multiple levels of directory at once, use cd / var/www for example, which will take you directly to the /www subdirectory of /var/.
Manipulating Files and Folders
You can manipulate files and folders using the following commands:- cp: The cp command will make a copy of a file for you. For example, cp file foo will make an exact copy of file and name it "foo," but the file "file" will still be there. When you use mv, that file would no longer exist, but when you use cp the file stays and a new copy is made.
- mv: The mv command will move a file to a different location or will rename a file. Examples are as follows: mv file foo will rename the file "file" to "foo." mv foo ~/Desktop will move the file "foo" to your desktop directory but will not rename it. You must specify a new file name to rename a file.
- To save on typing, you can substitute ~ in place of the home directory.
- rm: Use this command to remove or delete a file in your directory. It will not work on directories in which there are files.
- ls: The ls command will show you the files in your current directory. Used with certain options, you can see file sizes, when files were created, and file permissions. For example, ls ~ will show you the files that are in your home directory.
- mkdir: The mkdir command will allow you to create directories. For example, mkdir music will create a music directory.
- chmod: The chmod command will change the permissions on the files listed.
- chown: The chown command allows the user to change the user and group ownerships of a file. For example, chown jim file would change the ownership of the file to"Jim."
System Information Commands
System information commands include the following:- df: The df command displays filesystem disk space usage for all partitions. The command df-h is probably the most useful. It uses megabytes (M) and gigabytes (G) instead of blocks to report. (-h means "human-readable.")
- free: The free command displays the amount of free and used memory in the system. For example, free -m will give the information using megabytes, which is probably most useful for current computers.
- top: The top command displays information on your Linux system, running processes, and system resources, including the CPU, RAM, swap usage, and total number of tasks being run. To exit top, press Q.
- uname -a: The uname command with the -a option prints all system information, including machine name, kernel name, version, and a few other details. Most useful for checking which kernel you're using.
- lsb_release -a: The lsb_release command with the -a option prints version information for the Linux release you're running. For example:
- user@computer:~$ lsb_release -a
- LSB Version: n/a
- Distributor ID: Ubuntu
- Description: Ubuntu (The Breezy Badger Release)
- Release:
- Codename: breezy
- ifconfig: This reports on your system's network interfaces.
- iwconfig: The command iwconfig will show you any wireless network adapters and the wireless specific information from them, such as speed and network connected.
- ps: The command ps allows you to view all the processes running on the machine.
- lspci: The command lspci lists all PCI buses and devices connected to them. This commonly includes network cards and sound cards.
- lsusb: The command lsusb lists all USB buses and any connected USB devices, such as printers and thumb drives.
- lshal: The command lshal lists all devices the hardware abstraction layer (HAL) knows about, which should be most hardware on your system.
- lshw: The command lshw lists hardware on your system, including maker, type, and where it is connected.
Searching and Editing Text Files
Search and edit text files using the following commands:- grep: The command grep allows you to search inside a number of files for a particular search pattern and then print matching lines. For example, grep blah file will search for the text "blah" in the file and then print any matching lines.
- sed: The sed (or Stream EDitor) command allows search and replace of a particular string in a file. For example, if you wanted to find the string "cat" and replace it with "dog" in a file named pets, you would type sed s/cat/dog/g.
- cat: The cat command, short for concatenate, is useful for viewing and adding to text files. The simple cat FILENAME will display the contents of the file. Using cat filename file adds the contents of the first file to the second.
- nano: Nano is a simple text editor for the command line. To open a file, use nano filename. Commands listed at the bottom of the screen are accessed via ctrl+letter name.
- less: The less command is used for viewing text files as well as standard output. A common usage is to pipe another command through less to be able to see all the output, such as ls | less.
Dealing with Users and Groups
You can use the following commands to administer users and groups:- adduser: The adduser command will create a new user. To simply create a new user, type sudo adduser $loginname. This will create the user's home directory and default group. It will prompt for a user password and then further details about the user.
- passwd: The passwd command will change the user's password. If simply run by a regular user, it will change his password. If run using sudo, it can change any user's password. For example, sudo passwd joe will change Joe's password.
- who: The who command will tell you who is currently logged into the machine.
- addgroup: The addgroup command will add a new group. To create a new group, type sudo addgroup $groupname.
- deluser: The deluser command will remove a user from the system. To remove their files and home directory, you need to add the -remove-home option
- delgroup: The delgroup command will remove a group from the system. You cannot remove a group that is the primary group of any users.
Getting Help on the Command Line
This section will provide you with some tips on getting help on the command line. The commands -help and man are the two most important tools at the command line.Virtually all commands understand the -h (or -help) option which will produce a short usage description of the command and its options, then exit back to the command prompt. Try man -h or man -help to see this in action.
Every command and nearly every application in Linux will have a man (manual) file, so finding them is as simple as typing man command to bring up a longer manual entry for the specified command. For example, man mv will bring up the mv (Move) manual.
Some helpful tips for using the man command include:
- arrow keys: Move up and down the man file using the arrow keys.
- q: Quit back to the command prompt by typing q.
- man man: man man will bring up the manual entry for the man command, which is a good place to start!
- man intro: man intro is especially useful. It displays the Introduction to User Commands, which is a well-written, fairly brief introduction to the Linux command line.
Using Wildcards
Sometimes you need to look at or use multiple files at the same time. For instance, you might want to delete all .rar files or move all .odt files to another directory. Thankfully, there are series of wildcards you can use to acomplish this.- * will match any number of characters. For example, *.rar will match any file with the ending of .rar
- * ? will match any single character. For example, ?.rar will match a.rar but not ab.rar
- * [characters] will match any of the character within the brackets. For example, [ab].rar will match a.rar and b.rar but not c.rar
- * [!characters] will match any characters that are not listed. For example, [!ab].rar will match c.rar but not a.rar or b.rar.
Executing Multiple Commands
Often you may want to execute several commands together, either one after another or by passing output from one to another.Run Sequentially
If you need to execute multiple commands in sequence, but don't need to pass output between them, you can run them using ; between each command. Each command will be executed, and the following command will be run. If you want to make the running of the second command conditional on the successful completion of the first command, separate the commands with &&.If you need to execute multiple commands in sequence, but don't need to pass output between them, there are two options based on whether or not you want the subsequent commands to run only if the previous commands succeed or not. If you want the commands to run one after the other regardless of whether or not preceding commands succeed, place a ; between the commands. For example, if you want to get information about your hardware, you could run lspci ; lsusb, which would output information on your PCI buses and USB devices in sequence.
However, if you need to conditionally run the commands based on whether the previous command has succeeded, insert && between commands. An example of this is building a program from source, which is traditionally done with ./configure, make, and make install. The commands make and make install require that the previous commands have completed successfully, so you would use ./configure && make && make install.
Passing Output
If you need to pass the output of one command so that it goes to the input of the next, you need something called piping after the character used between the commands, | , which looks like a vertical bar or pipe.To use the pipe, insert the | between each command. For example, using the | in the command ls | less allows you to view the contents of the ls more easily.
How to configure syslogd on AIX (/etc/syslogd.conf)
The following steps will guide you through configuring syslog on an AIX system.This info is valid for AIX 4.3.3, AIX 5.1, AIX 5.2 and AIX 5.3.
By default, an AIX system will not do syslog'ging. For a strange reason, the default install on an AIX install will not place entry's in /etc/syslog.conf, leaving a totl userless syslogd.
Even more, comparing the syslogd on AIX to another Unix, (ex: Linux), you will notice that <facility>.* doesn't work. So make sure that your priority level is never *.
Comming from a Linux world, you most probably want the following config:
mail.debug      /var/log/mail
user.debug      /var/log/user
kern.debug      /var/log/kern
syslog.debug    /var/log/syslog
daemon.debug    /var/log/daemon
auth.debug      /var/log/secure
local2.debug    /var/log/sudo
As AIX standard has no logrotate daemon running, you want to adapt syslogd todo the rotating on his own, an example would be:
Open the /etc/syslogd.conf file and comment those logs which you want to capture like *.debuglog. Now perform the following steps to configure it.
mail.debug   /var/log/mail  rotate size 100k files 4  # 4 files, 100kB each
user.debug   /var/log/user  rotate files 12 time 1m  # 12 files, monthly rotate
kern.debug   /var/log/kern  rotate files 12 time 1m compress # 12 files, monthly
rotate, compress
You can change the size and number of log files by simply changing the values of size and number of files.When adaptions are made to /etc/syslog.conf, make sure to restart syslogd.
[root@sys /] refresh -s syslogd
0513-095 The request for subsystem refresh was  completed successfully.
If you make any changes in /etc/syslogd.conf file then do remember to start the syslogd daemon to
reflect the changes in effect.
Files under /var/log directory and their usage.
* /var/log/messages – Contains global system messages, including the messages
that are logged during system startup. There are several things that are logged
in /var/log/messages including mail, cron, daemon, kern, auth, etc.
* /var/log/dmesg – Contains kernel ring buffer information. When the system
boots up, it prints number of messages on the screen that displays information
about the hardware devices that the kernel detects during boot process. These
messages are available in kernel ring buffer and whenever the new message comes
the old message gets overwritten. You can also view the content of this file
using the dmesg command.
* /var/log/auth.log – Contains system authorization information, including
user logins and authentication machinsm that were used.
* /var/log/boot.log – Contains information that are logged when the system
boots
* /var/log/daemon.log – Contains information logged by the various background
daemons that runs on the system
* /var/log/dpkg.log – Contains information that are logged when a package is
installed or removed using dpkg command
* /var/log/kern.log – Contains information logged by the kernel. Helpful for
you to troubleshoot a custom-built kernel.
* /var/log/lastlog – Displays the recent login information for all the users.
This is not an ascii file. You should use lastlog command to view the content
of this file.
* /var/log/maillog /var/log/mail.log – Contains the log information from the
mail server that is running on the system. For example, sendmail logs
information about all the sent items to this file
* /var/log/user.log – Contains information about all user level logs
* /var/log/Xorg.x.log – Log messages from the X
* /var/log/alternatives.log – Information by the update-alternatives are
logged into this log file. On Ubuntu, update-alternatives maintains symbolic
links determining default commands.
* /var/log/btmp – This file contains information about failed login attemps.
Use the last command to view the btmp file. For example, “last -f /var/log/btmp
| more”
* /var/log/cups – All printer and printing related log messages
* /var/log/anaconda.log – When you install Linux, all installation related
messages are stored in this log file
* /var/log/yum.log – Contains information that are logged when a package is
installed using yum
* /var/log/cron – Whenever cron daemon (or anacron) starts a cron job, it
logs the information about the cron job in this file
* /var/log/secure – Contains information related to authentication and
authorization privileges. For example, sshd logs all the messages here, including
unsuccessful login.
* /var/log/wtmp or /var/log/utmp – Contains login records. Using wtmp you can
find out who is logged into the system. who command uses this file to display
the information.
* /var/log/faillog – Contains user failed login attemps. Use faillog command
to display the content of this file.
Apart from the above log files, /var/log directory may also contain the
following sub-directories depending on the application that is running on your
system.
* /var/log/httpd/ (or) /var/log/apache2 – Contains the apache web server
access_log and error_log
* /var/log/lighttpd/ – Contains light HTTPD access_log and error_log
* /var/log/conman/ – Log files for ConMan client. conman connects remote
consoles that are managed by conmand daemon.
* /var/log/mail/ – This subdirectory contains additional logs from your mail
server. For example, sendmail stores the collected mail statistics in
/var/log/mail/statistics file
* /var/log/prelink/ – prelink program modifies shared libraries and linked
binaries to speed up the startup process. /var/log/prelink/prelink.log contains
the information about the .so file that was modified by the prelink.
* /var/log/audit/ – Contains logs information stored by the Linux audit
daemon (auditd).
* /var/log/setroubleshoot/ – SELinux uses setroubleshootd (SE Trouble Shoot
Daemon) to notify about issues in the security context of files, and logs those
information in this log file.
* /var/log/samba/ – Contains log information stored by samba, which is used
to connect Windows to Linux.
* /var/log/sa/ – Contains the daily sar files that are collected by the
sysstat package.
* /var/log/sssd/ – Use by system security services daemon that manage access
to remote directories and authentication mechanismsDifference between HTOP and TOP command.
- In 'htop', facility of scrolling the list is vertically and horizontally to see all processes and complete command lines but with 'top' its not.
- In 'top' you are subject to a delay for each unassigned key you press (especially annoying when multi-key escape sequences are triggered by accident).
- 'htop' starts quicker ('top' requires time to collect data for a while before displaying anything).
- In 'htop', to kill a process doesn't need to type the process number but in 'top' does.
- In 'htop' to reset the priority of process or renice the process, htop doesn't require to type the process number but with 'top' needed.
- 'htop' supports mouse operation, 'top' doesn't
How to find architecture (32/64 Bit) on Linux?
Using command : uname -a
Using File :
* On OpenSuSe : cat /etc/SuSE-release
Using File :
* On OpenSuSe : cat /etc/SuSE-release
* On Red hat : cat /etc/redhat-release
No comments:
Post a Comment